INSTALLATION RECOMMENDATION FOR KNUMOX ELEMENTS ON ROOF TERRACE FASTENING
-

Roof terrace fastening 100 cm (central, corner, side)
-

Roof terrace fastening 60 cm (central, corner, side)
-

Installation with slab covering
-

Installation with wooden terrace
1. Allgemeiner Zweck der Dachterrassenbefestigung
Die Dachterrassenbefestigung der KNUMOX GmbH wurde speziell für den durchdringungsfreien Einbau von KNUMOX Glaselementen auf:
- Dachterrassen
- Flachdächern
- Garagen
Sie erlaubt eine sichere Montage ohne Eingriff in die Dachabdichtung, vermeidet Wärmebrücken und reduziert Körperschallübertragung in die darunterliegende Deckenkonstruktion.
2. Varianten der Dachterrassenbefestigung
Die Befestigungen sind für zwei Standardbreiten erhältlich:
- Elementbreite: 100 cm Befestigungsart: mittig, über Eck, seitlich
- Elementbreite: 60 cm Befestigungsart: mittig, über Eck, seitlich
3. Auflast – Mindestanforderungen
Zur sicheren Montage ist eine bestimmte Mindestauflast erforderlich (bauseits sicherzustellen):
- Befestigungstyp: S 60 Erforderliche Auflast (kg/m²): 90 kg/m²
- Befestigungstyp: M 60 Erforderliche Auflast (kg/m²): 50 kg/m²
- Befestigungstyp: E 60 Erforderliche Auflast (kg/m²): 110 kg/m²
- Befestigungstyp: S 100 Erforderliche Auflast (kg/m²): 115 kg/m²
- Befestigungstyp: M 100 Erforderliche Auflast (kg/m²): 72 kg/m²
- Befestigungstyp: E 100 Erforderliche Auflast (kg/m²): 128 kg/m²
Wichtig: Als Auflast zählen nur feste Beläge wie Betonplatten, Pflaster oder Holz. Substrat oder Erde
werden nicht berücksichtigt.
4. Fachgerechte Montage
Nur durch Fachbetriebe zulässig!
- Eigenmontage ist unzulässig und führt zum Ausschluss von Haftung und Gewährleistung.
- Die Statik des Daches muss im Vorfeld durch einen Statiker geprüft werden.
- Die Dachterrassenbefestigung ist nicht automatisch als Absturzsicherung klassifiziert – dafür ist ggf. eine Sonderstatik notwendig
.
5. Planung & Projektbeteiligte
Ein erfolgreiches Projekt erfordert Abstimmung zwischen:
- Hauseigentümer (Zustimmung, Beauftragung, Finanzierung)
- Pächter/Gastronom (Design, Funktion, Wirtschaftlichkeit)
- Architekt/Statiker (Positionierung, Statik, Baurecht)
- Ausführendes Gewerk (fachgerechte Montage)
6. Vor der Planung unbedingt beachten
Bitte prüfen bzw. klären Sie vor Baubeginn folgende Punkte:
- Zulässige ständige/temporäre Auflast des Daches
- Nutzungskategorie: öffentlich/privat/gewerblich
- Erforderliche Nachweise für Absturzsicherungen
- Windzone und Windlasten
- Art und Gewicht des Bodenbelags
- Erforderliche Geländerhöhe (nach Bauordnung)
- Freie Fläche zur Platzierung der Lastaufnahme
- Wasser muss ungehindert ablaufen können
7. Normen & technische Hinweise
- Es gelten die Regeln der Flachdachrichtliniem (Stand Mai 2019)
- Empfohlenes Gefälle: ≥ 2 %, besser 5 %
- Relevante DIN-Normen: DIN 18531–18535
Inserting the KNUMOX glass element
Before inserting the glass element, the following steps must be carried out:

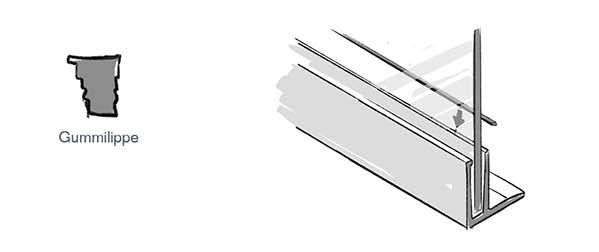
1. Insert the rubber seal (flat, finely grooved) flush into the prefabricated groove of the aluminum block.

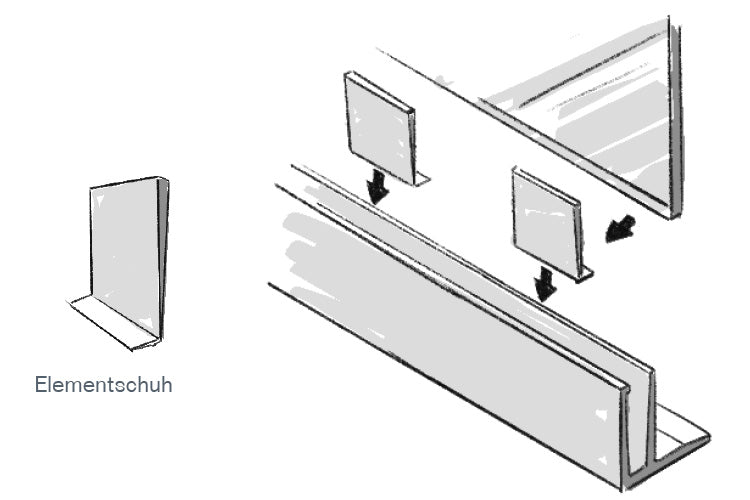
2. Insert the element shoes into the aluminum block. Distribute these evenly over the appropriate length. Then carefully insert the glass element into the aluminum block (on the white “shoes”) and hold it.

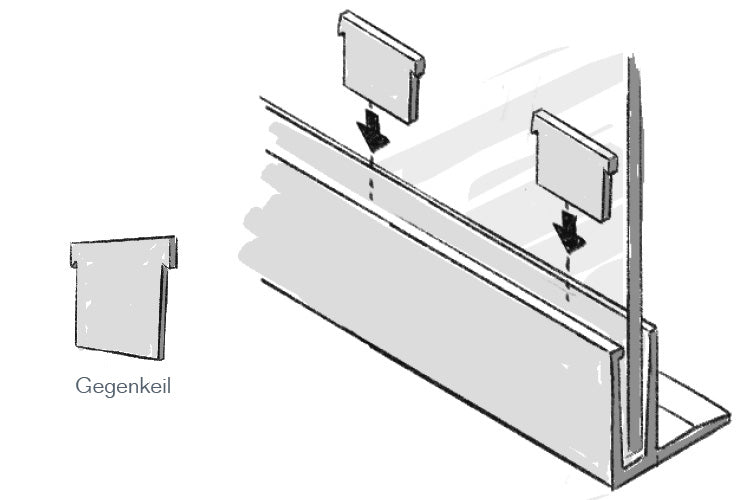
3. Opposites on opposite side with the smooth side
to the glass. Then press these firmly in with a tool (flat screwdriver) the KNUMOX impact tool so that the glass element is firmly seated, at least deep enough for the rubber to fit over it later.

4. Insert the remaining rubber lip and press it in firmly.
Sonderlösungen & Projektunterstützung
Sollte die Standardlösung nicht passen, bietet KNUMOX Sonderanfertigungen an – sprechen Sie uns an. Eine enge Abstimmung mit allen Projektbeteiligten wird empfohlen.
Wichtiger Hinweis zur Gewährleistung
Die Missachtung dieser Montageanleitung führt zum Ausschluss jeglicher Haftung und Gewährleistung durch die KNUMOX GmbH.


